How To Crochet A Pull Tab Flower

Crochet a Flower With Pull Tabs
Want to learn how to crochet with pull tabs? Here are step-by-step instructions with photos. Use the crochet flower as a tabletop coaster, a Christmas ornament, or as part of a bigger project.
If you want to buy an already made pop-top purse you can shop all of our our purses, and clutch bags on our online store.
Step 1: Materials & Tools
- 6 pull tabs
- Crochet thread (1 or 2 colors). We recommend a strong synthetic fiber that is resistant to abrasion
- Lighter
- Scissors
- Wire cutters
- No. 3 crochet needle
Step 2: Prepare Your Pull Tabs
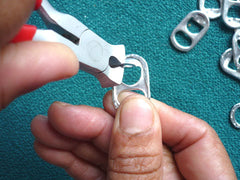
Choose tabs that are in good condition. Wash them until they are clean and shiny. Use the wire cutters to remove any sharp edges from the pull tab.
Step 3: Start Crocheting
Here is a brief video tutorial. For more text and image instructions scroll down.
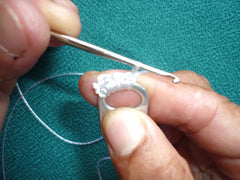
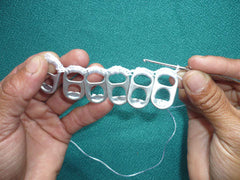
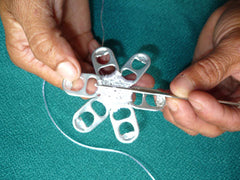
Begin crocheting the center of the flower using a single stitch to cover the 'thin side' of the tab (top figure) (the side that's pulled when a can is opened). Repeat this step, joining all 6 pull-tabs in a line. (bottom figure).
Step 4: Connect the Circle
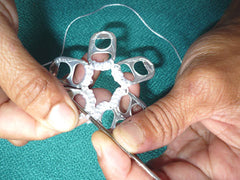
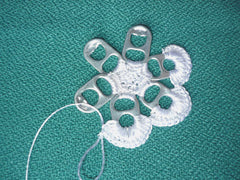
Pull the line of tabs into a circle and crochet them together (top figure). Fill in the middle space with single stitches until it forms the center of the flower (bottom figure). Cut the thread leaving a small tail. Burn the thread's end with the lighter to prevent the thread from fraying.
Step 5: Add Color to the 'Petals'
Cover the outer ring of the pull-tab using a double stitch with different colored thread. There are 22 double stitches per tab.
Step 6: Cover and Connect
Cover all tabs in this same manner, connecting each of the petals together.

Step 7: Finish the Flower
When the last pull tab is covered, join it to the first one with a single stitch. Finish it off by burning the end of the thread to prevent fraying. You're done!
Sew or hot glue a pin on the back to create a brooch
Attach a loop of thread to create a snowflake holiday ornament
Crochet many flowers together to form a wall hanging or a scarf.
How To Crochet A Flower With Pop Tabs Video By Escama Studio, Click Here
How to Make A Pop Tab Necklace Free Tutorial, Click Here.
Rose Cashman, If no one has mentioned, Ronald Mcdonald houses will always take you pop can tabs. Check with schools and see if they are collecting them also
bonjour, merci beaucoup pour ce magnifique tuto
je vais essayer pour faire des petits cadeaux
My husband has collected a huge amount of pop can tops and doesn’t know where to send them.. If anyone is interested we would be very happy to give them away. Thank you.
LOVE it soooo cool! I joined a bunch of these together and made a bag!
Love it
Leave a comment